Call Buttons
SYNQ call buttons provide a friendly easy to use button that relays a customer's request for assistance to the notification channel of your choosing.
Hardware Components
A typical store deployment includes the following hardware components:
- One Call Button Hub
- Multiple Call Buttons
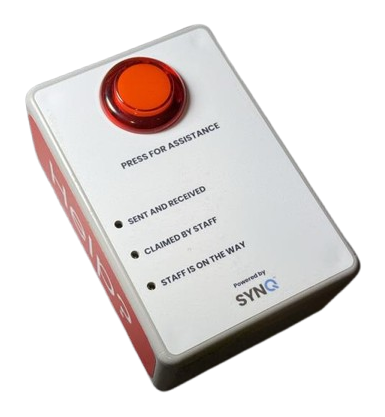
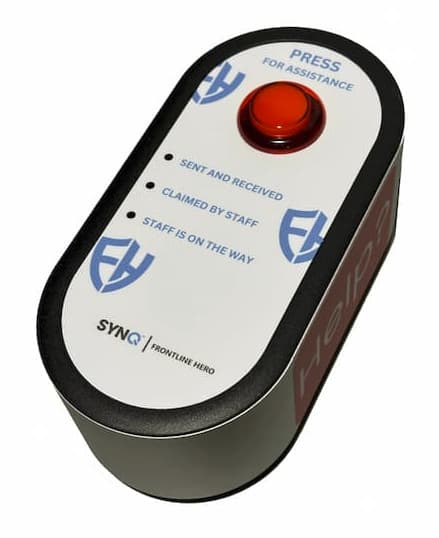
Call Button
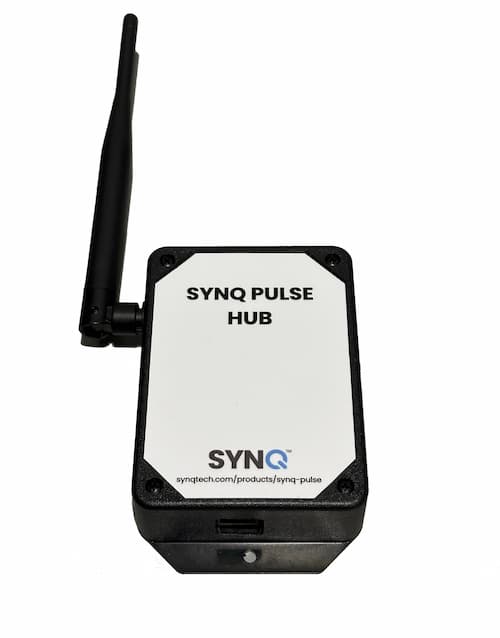
Call Button Hub
Hardware Networking
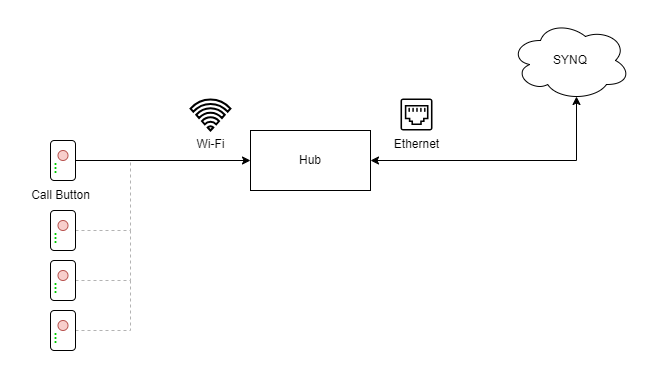
The Hub communicates with SYNQ's cloud services over the wired Ethernet connection.
The Call Buttons communicate with the Hub over Wi-Fi.
Requirements
The Call Button Hub requires the following:
- An Ethernet connection that provides both network connectivity and Power over Ethernet (PoE)
- Network must have DHCP enabled
- Network must allow access to Google Public DNS IP addresses:
8.8.8.8and8.8.4.4on port53 - Network must allow access to Google Public Network Time Protocol (NTP) server
time.google.comon port123 - Network must allow access to SYNQ's cloud services
callforhelp.synqtech.comon port443
Getting Started
- Ensure you have Microsoft Teams (or an alternative messaging platform) configured. See Microsoft Teams for complete details.
- Verify that your buttons are registered in Call For Help
- Sign into MyStore
- Select Call for Help
- Select Settings
- Scroll down to Call for Help Buttons
- You should see all your buttons listed
note
When you purchase call buttons from SYNQ we typically import them into your store location before they are shipped to you. However, they will have default values for most configuration options.
- Edit each button to set appropriate names, prompts, and notification channels
tip
During initial setup we recommend setting the notification channel of each button to a "Test" channel. This makes testing easier and avoids sending unwanted test notifications to other staff.
- See Add a new Call Button if you need to add buttons.
- Install the Hub
- Connect the hub to an Ethernet connection that provides both network connectivity and power.
- Deploy the hub high up in a central location that is free from obstructions (for example, escalators) to maximize coverage.
note
Multiple hub units may be required in very large locations, or in locations with Wi-Fi interference.
- Test Buttons
- Ensure each button contains batteries
- Bring the button close to the hub
- Press the button
- Verify in Microsoft Teams that the expected notification appears
- Once the button has been verified move the button to the desired location within your store
- Test again
note
To avoid abuse, call buttons will only process one request every 120 seconds. Keep this in mind as you test. You may have to wait a moment before pressing the button again.
- If a button does not raise a notification, try moving the button to a location nearer to the hub and testing again.
- Update each button in MyStore to set the desired notification channels.
- Test buttons again to ensure messages are delivered to the desired channels.
Add a new Call Button
To add a new call button to your Call for Help system:
- Sign into MyStore
- Select Call for Help
- Select Settings
- Scroll down to Call for Help Buttons
- Click the + button
- Enter the following information:
- Name
- In Store Location Label
- Mac Addr.
tip
The MAC Address is printed on a label on the back of the button.
- Prompt
- Notification Channel
- Escalations Channel
- Click Create
Modify Call Button Properties
To change properties of a call button, such as the Name, Location, or Notification Channel:
- Sign into MyStore
- Select Call for Help
- Select Settings
- Scroll down to Call for Help Buttons
- Click the ⋮ menu on the desired call button and select Edit
- Update the button settings as desired
- Click Update
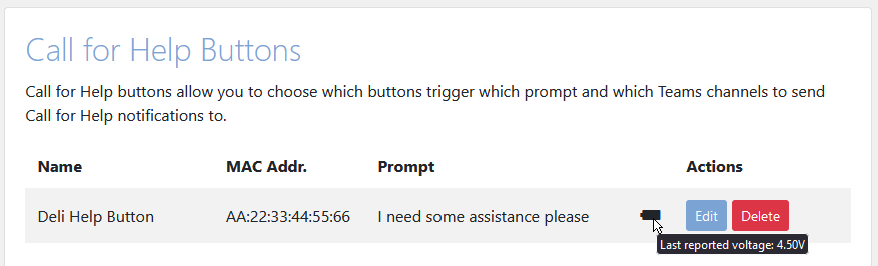
Battery Level
SYNQ Call For Help Buttons are powered by 4 x AA batteries.
Every time a call button communicates with the SYNQ cloud it reports its battery level. The last reported battery level of each button is shown in the Call for Help Buttons section.
Mounting Buttons
SYNQ Call For Help Buttons are versatile and intended to support a number of mounting situations. Before deploying your buttons you should give some though to where each button will be placed and what type of mounting application they will need.
Common Mounting Applications
- Velcro
- Double sided tape
Physical Specifications
- Call Button
- Height: 4.1875"
- Width: 3.1875"
- Depth: 2.25"
- Weight: 7oz
- Hub
- Height: 5.5"
- Width: 3.355"
- Depth: 1.357"
- Weight: 5oz
Button Label
A label is applied to the front face of the call button. This label provides instructions and feedback to the customer, but it can also include your store's branding.
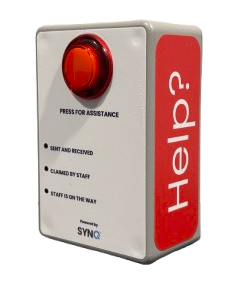
Button Signage
Before deploying your buttons it is a good idea to consider if you want to apply signage to or near your button to draw your customer's attention to it. This can increase the likelihood that customers will use the button.
Signage Examples
Common Deployments
Retailers and individual store locations are diverse so there is no one-size-fits all pattern for deploying call buttons and Teams channels. However, we've seen a lot of these and have some suggestions that work for most locations.
- Create channels that represent logical groups of staff that should receive a certain type of message.
- Departments like Automotive, Deli, Floral, or Paint tend to have specialized/dedicated staff. These often warrant dedicated channels.
- Create a general purpose "General" channel.
- Create one or more channels to be used for escalations. These channels should include managers or staff in supervisory roles.
- Strategically place buttons throughout your store in areas where customers may require assistance.
- Deploy buttons in consistent locations
- If you are going to put a button is every aisle, place it is the same location (center, end) of every aisle to provide consistency
- Button naming
- The "In Store Location Label" you configure for a button in MyStore is what your staff will see in Teams notifications. Make sure you use unambiguous names that will make sense for your staff.
- Signage
- Use signage to draw attention to your call buttons
Example button deployments
What does a recommended Teams deployment look like for 5, 10, 20, 50 buttons? Where do you put the buttons? What Teams channels should you create? What buttons notify on what channels?
For all deployments we recommend you create a "Manager" or "Escalations" channel to direct all escalations for call button presses that go unanswered.
Hardware Store with 5 buttons
| Button Location | Teams Channel |
|---|---|
| Customer Service Desk | General |
| Aisle 4 - Housewares | General |
| Automotive Desk | Automotive |
| Aisle 24 - Oil/Air Filters | Automotive |
| Paint Desk | Paint |
Hardware Store with 10 buttons
| Button Location | Teams Channel |
|---|---|
| Customer Service Desk | General |
| Aisle 2 - Seasonal | General |
| Aisle 4 - Housewares | General |
| Aisle 31 - Stuff | General |
| Aisle 32 - Stuff | General |
| Aisle 33 - Stuff | General |
| Automotive Desk | Automotive |
| Aisle 24 - Oil/Air Filters | Automotive |
| Aisle 7 - Electrical | Hardware |
| Aisle 9 - Plumbing | Hardware |
Grocery Store with 5 buttons
| Button Location | Teams Channel |
|---|---|
| Customer Service Desk | General |
| Aisle 4 - Stuff | General |
| Produce - Seasonal | Produce |
| Bakery | Bakery |
| Meats/Deli | Meats/Deli |
Grocery Store with 10 buttons
| Button Location | Teams Channel |
|---|---|
| Customer Service Desk | General |
| Aisle 4 - Stuff | General |
| Aisle 5 - Stuff | General |
| Aisle 6 - Stuff | General |
| Aisle 7 - Stuff | General |
| Restrooms | General |
| Produce - Seasonal | Produce |
| Bakery | Bakery |
| Deli | Deli |
| Meats | Meats |
Button to Hub Communication Protocol
- Protocol: ESP-NOW
- Frequency: 2.4 GHz (channel 1)
- Data Rate: 250 kbps
- Power: -20 dBm
Troubleshooting
Hub LED indicator lights
There are four indicator lights on the hub. Two on the external RJ45 jack and two internal ones on the circuit board.
The indicator lights on the hub during the startup process are as follows:
- When the hub gets plugged into your switch, the internal green power indicator LED will be solid on.
- If this LED is not lit, the hub is not receiving power. This suggests that your switch is not providing Power over Ethernet (PoE).
- The internal green micro controller activity LED will blink.
- If this LED is solid on or off this indicates a micro controller error condition.
- The amber light on the RJ45 jack will be solid on when the LAN chip is configured and the device requests an IP address from the network DHCP server.
- Once the network assigns the hub an IP address, the green indicator light on the RJ45 jack will go solid on, and the amber light will begin to blink with data activity.
Button can't communicate with the hub
If a button press does not result in a Teams notification the button may be having trouble connecting to the hub due to Wi-Fi interference.
- Try moving the button closer to the hub and testing again. If the button works closer to the hub you can wander around with the button (keep in mind the 120 second throttle) to try to identify areas of interference. You may need to relocate the hub, or add another hub.
Message doesn't arrive in Teams
The configured notification channel of the button my be incorrect.
- Edit the button in MyStore
- Verify that button is configured to with the the expected Teams channel.
Message arrives in Teams, but does not notify
Notifications may be disabled for the channel in Teams.
- Click the ⋯ menu on the channel in Teams
- Select Channel notifications
- Modify the notification setting
- Click Save
Advanced Button Press Actions
- Long press releasing after the first flash of the LEDs. Cancels/completes the current request.
- Long press releasing after the second flash of the LEDs. The LEDs blink out the firmware version number. For example:
1.2.3. - Long press releasing after the fifth flash of the LEDs. Hard reset of the button.
Legacy Form Factor
Dimensions
- Height: 6.5"
- Width: 3"
- Depth: 2.5"